

Step 1 — Determine screen size
Set the projector up as you intend to use it. Turn it on.
Measure the height and width of the image with a tape.
Plan the size of your screen accordingly.
My image is 42" high and about 75" wide. A 4x8' (48x96") panel of hardboard was therefore a convenient surface to use as a screen. I could've cut it down, but the extra area doesn't look bad, and
may be useful someday.


Step 2 — Build screen
Cut 1x2 frame members with a miter box and saw. It's best to measure, mark, and test each piece as you go, but as a rough guide here's the cut list for my 4x8' screen:
Two pcs. 96" long on outside edge, mitered ends
Two pcs. 48" long on outside edge, mitered ends
Two pcs. 45" long, square ends
Tack the 1x2s in place with hot glue.
Secure the 1x2s with 1" wood screws every 10" or so.
I actually attached the frame timbers after applying the screen finish, so I had to install screws from back to front, being careful not to accidentally damage the finish on the screen side.
Don't do it that way. Instead, install screws from the front side of the unfinished screen, countersink them, and fill the depressions with wood putty.


Step 3 — Lay out plastic sheet
A plastic painter's drop cloth will be used to collect loose glass beads after the application of the screen surface.
Spread the plastic in a clean area with a smooth floor.
Tape the edges of the sheet down.
Set your screen panel down in the middle of the plastic sheet.


Step 4 — Apply basecoat
Paint the edges of your screen surface first. I used a 1" disposable foam brush.
Apply a smooth, even coat of paint to the screen area using a roller.
Though I used a paint tray for the first coat, by the second coat I figured out it's easier to just pour the paint out of the can directly onto the screen, Jackson Pollock-style, and then smooth
it out with the roller.
Let the basecoat dry 24 hours.


Step 5 — Ready glass beads
Pour out your supply of glass beads into a plastic tub.
A cheap plastic dustpan makes a convenient applicator for the sprinkling process. With just a bit of practice, it's easy to get a fairly even sheet of falling beads.


Step 6 — Apply topcoat
After 24 hours, apply a second coat of paint to the screen edges, as before.
Pour out about 1/2 quart of paint, directly from the can onto the screen, doing your best to distribute it evenly around the surface.
Roller the paint smooth. You want a quick, even, fairly heavy coat.
Try to get a smooth coat, but don't fret too much, either now or later, about small surface imperfections. The process is remarkably tolerant of these.


Step 7 — Sprinkle on glass beads
Immediately after applying the topcoat, while it's still wet, start sprinkling glass beads generously over the entire surface.
Be careful not to miss any areas. Once the paint is dry, the surface is very difficult to touch up, so be sure to get adequate coverage the first time 'round.
Don't be stingy with the beads; go ahead and apply them all. Excess will be collected later and it's better to use too much than too little.
Leave the beads undisturbed at least 24 hours for the paint to dry.


Step 8 — Brush off excess beads
Once the paint has dried for 24 hours, brush off the excess glass beads using a plastic fiber brush. I used the brush that came with my dustpan.
The glass bead coating is actually quite robust. It makes sense to start gently, but you will soon realize you don't have to baby it.
When most of the beads have been brushed away, lift the screen from one edge and give it a a few thumps on the backside to dislodge any remaining loose beads.
Stand the screen upright and give it a final brushing. Peel off any paint flash around the edge of the screen with your fingers.


Step 9 — Recover loose beads
Gather up the tarp, from the edges, into a "sack," as shown.
Lift the sack into your plastic tub or tray.
Release one edge of the tarp and slowly work it out from underneath the mass of recovered glass.
I recovered almost two-thirds (16/25 lbs) of the beads I applied using this method.


Step 10 — Install wall anchors
For my 48x96" screen, I positioned a row of four anchors eight inches down from the ceiling with 20" between them. When the screen is centered on the anchors, that leaves 18" from each edge to
the nearest anchor.
I used screw-in metal drywall anchors rated to 40 lbs vertical load apiece. These require no pre-drilling; just position them over your pencil mark and turn them in with a screwdriver.
The anchors come with screws. I put each one through a 1/2" plastic spacer and turned it down until the spacer could no longer rattle.


Step 11 — Hang screen
Clean gloves are a good idea, when handling the finished screen, so as not to get dirt or oil on the surface.
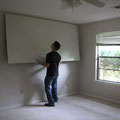
Depending on the size and weight of your finished screen, you may want to get help lifting it. Be careful!
Tilt the top of the screen slightly back over your head and lift it, along the wall, until it is well above the row of anchors.
Let the top of the screen fall back against the wall, and slowly lower the screen until the upper frame member catches against the wall anchors.


Step 12 — Use it!
Turn on your projector and, if necessary, refocus the image.
Adjust the left-right position of the screen, as necessary, to center the image.
The projector itself may be aimed up or down to fine-tune the vertical centering. Many projectors include an "image shift" function for this purpose, as well.


